
Imagine you're a microbiologist in a lab, tasked with quickly identifying various microorganisms under a microscope. Each slide presents a different challenge: Is it an amoeba? A paramecium? Maybe a type of bacteria, but which kind? Identifying these tiny organisms can be time-consuming and prone to human error, especially when the distinctions are subtle. What if you had an AI-powered assistant capable of identifying microorganisms instantly and with precision?
This isn’t science fiction—it’s possible today using Azure Custom Vision! In this blog, we’ll show you how to build an image classification model specifically designed to recognize different types of microorganisms, including:
- Amoeba
- Euglena
- Hydra
- Paramecium
- Spherical Bacteria
- Rod Bacteria
- Spiral Bacteria
- Yeast
Step 1: Set Up Your Azure Custom Vision Resource
Before we begin building the model, we need to set up the infrastructure that will power it.
1. Go to the Azure Portal and search for Custom Vision.
2. Create a new Custom Vision resource, selecting the Training and Prediction resource types.
3. Provide basic details like your subscription, resource group, region, and pricing tier. For this project, the free tier will work just fine.

Once you’ve set up the resource, head over to the Custom Vision portal (https://www.customvision.ai/ ) to start creating your microorganism classifier.
Step 2: Create a New Custom Vision Project
Now that your resources are in place, it's time to create your first project for microorganism identification.
1. In the Custom Vision portal, click on New Project.
2. Give your project a name, such as "Microorganism Classifier."
3. Select Classification as the project type, since we are identifying the types of microorganisms.
4. Choose whether you want Single-label (one tag per image) or Multi-label (multiple tags per image). For this project, Single-label works best.
5. In the Domains section, select General to ensure flexibility in recognizing diverse microorganism shapes and textures.

Step 3: Upload and Tag Images
Now, it’s time to teach your AI what each microorganism looks like by uploading images.
1. Gather a collection of labeled images for each microorganism. Ideally, aim for at least 50–100 images for each organism type to ensure accurate training. You can also take advantage of existing datasets eg from https://www.kaggle.com/
- Amoeba: Typically blob-like with pseudopodia.
- Euglena: An elongated, oval shape with a flagellum for movement.
- Hydra: A small, tubular organism with tentacles.
- Paramecium: A slipper-shaped organism with cilia.
- Spherical Bacteria: Round-shaped bacteria, often in clusters.
- Rod Bacteria: Cylindrical-shaped bacteria.
- Spiral Bacteria: Corkscrew-shaped, highly distinctive.
- Yeast: Spherical to oval-shaped fungi, often seen in budding forms.
2. In the Custom Vision Portal, click Add Images and upload your dataset.
3. Assign the appropriate tags to each image, like “Amoeba” or “Rod Bacteria.”
4. Once all your images are uploaded and tagged, you’ll have a strong foundation to train the model.
Step 4: Train the Microorganism Classifier
Now that your images are uploaded and labeled, it’s time to train the model.
1. In the project dashboard, click the Train button at the top right.
2. You can choose between Quick Training (good for small datasets) or Advanced Training (offers more customization options). For this project, let’s go with Quick Training.

3. The training process may take a few minutes depending on the size of your dataset. Custom Vision will leverage Azure’s powerful cloud infrastructure to analyze your images and learn the patterns that distinguish different microorganisms.
Once the model is trained, you’ll be able to view metrics like Precision, Recall, and Accuracy, which indicate how well your model performs.

Step 5: Test the Model
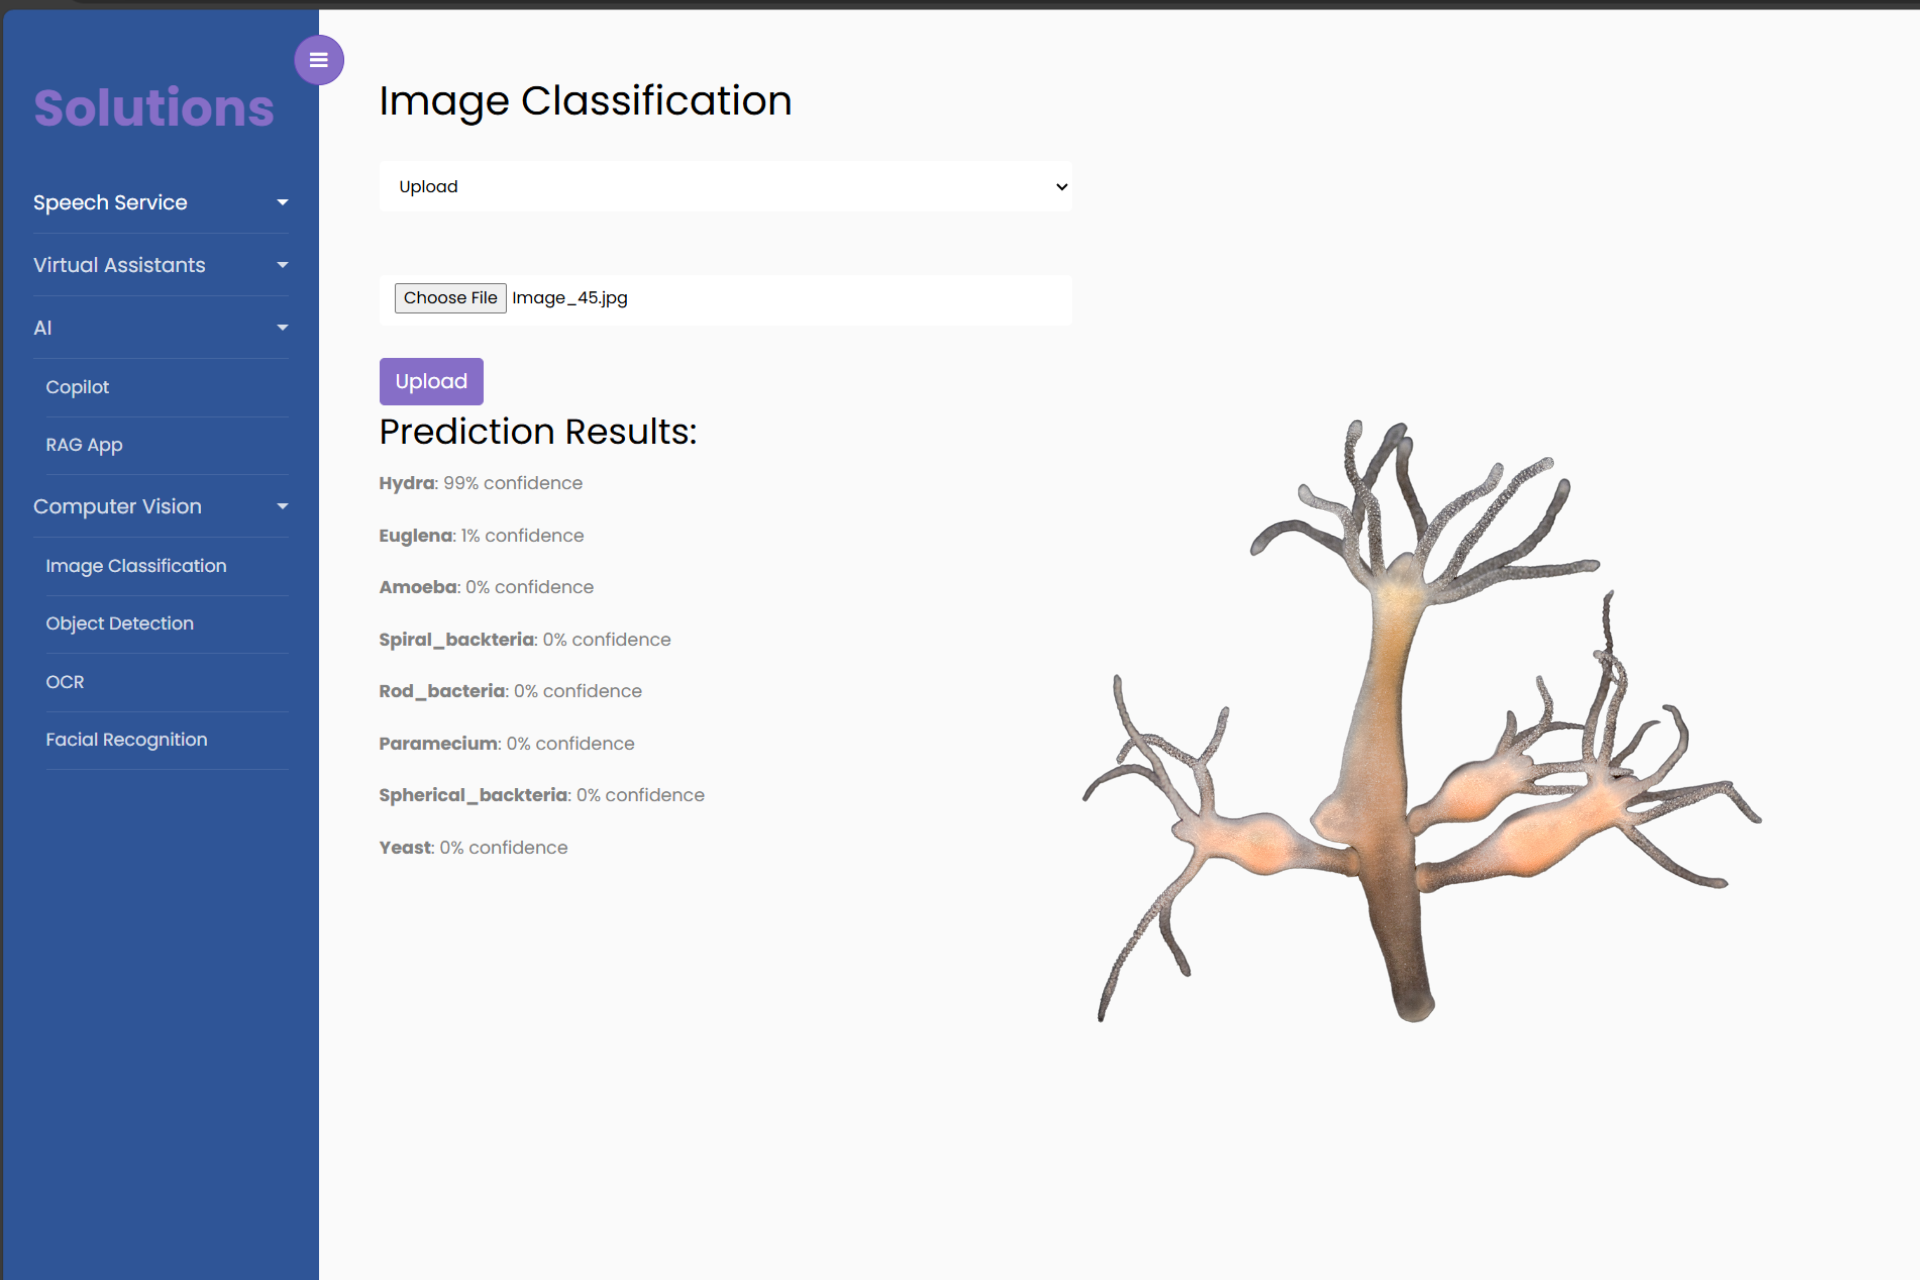
After training, it’s time to see how well your AI performs in identifying microorganisms.
1. Upload new, unseen images of microorganisms to test the classifier. For instance, take an image of a Paramecium and see how well the model identifies it. You can as well input an image url.
2. Analyze the results. You’ll be able to see the predicted label and the confidence level (e.g., 95% certain this is a Paramecium).

3. If the model is not performing well, you can return to the project and upload more training data to improve accuracy.
Step 6: Optimize and Retrain
You may find that the model performs well on some microorganisms but struggles with others. Don’t worry—this is common. Here are some ways to improve it:
- Add More Images: The more diverse the training images, the better the model will become at identifying each microorganism.
- Data Augmentation: Use images taken from different angles, lighting conditions, and magnifications.
- Rebalance Classes: If the model is biased toward identifying one microorganism over others, ensure each class has a similar number of training images.
Once you’ve gathered more images or made any adjustments, retrain the model to improve its performance.
Step 7: Publish and Deploy the Model
Now that you’ve trained and fine-tuned the microorganism classifier, it’s time to make it available for real-world use.
1. Click Publish on your trained model.
2. Select a Prediction Resource and give your model a descriptive name.
3. Once published, you’ll receive a Prediction URL and API Key, which can be used to integrate the model into applications, web apps, or lab equipment.
This model is just the beginning. You can continue to expand it by adding more microorganisms or retraining it with new data as it becomes available.
Now it’s your turn to give it a try—what microorganism will your model identify next?
<